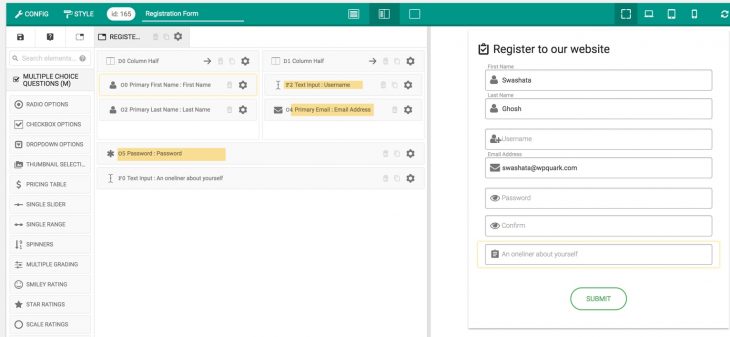
With eForm v3.4 it is now possible to create a completely customizable user registration form for your WordPress website. Apart from the basic first name, last name, email, username and password, you can have as many custom user meta as you want.
Before we discuss how we are going to create a registration form, let us see one in action.
If you are feeling enthusiastic here is the import code.
[button style=”btn-primary btn-lg btn-block” icon=”glyphicon glyphicon-download-alt” align=”left” type=”link” target=”true” title=”Download Registration Form Import Code” link=”https://pastebin.com/v74JbH2S” linkrel=””]
Setup a Registration Compatible eForm
To make registration work with eForm, you are required to add at least the following fields/elements to your form.
- Other Form Elements > Primary First Name .
- Other Form Elements > Primary Last Name.
- Other Form Elements > Primary Email.
- Text Input & Upload > Text Input (to be used as username).
- Other Form Elements > Password (to be used as password).
You can add more elements to your form, but that is upto you.
Enable Registration
Once all the required fields are present in your form, please do the following to enable user registration.
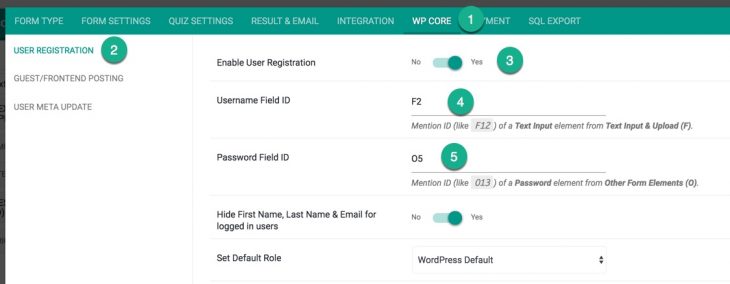
- Go to CONFIG > WP Core > User Registration.
- Enable User Registration.
- Enter the ID of the small text element that you are going to use for username like
F0orF1. - Enter the ID of the password element that you are going to use for password.
- Set Default Role for the user who registers.
Now save the form and publish. It is ready to register users to your WordPress database.
Custom User Meta
It is also possible to add custom usermeta data on signup.
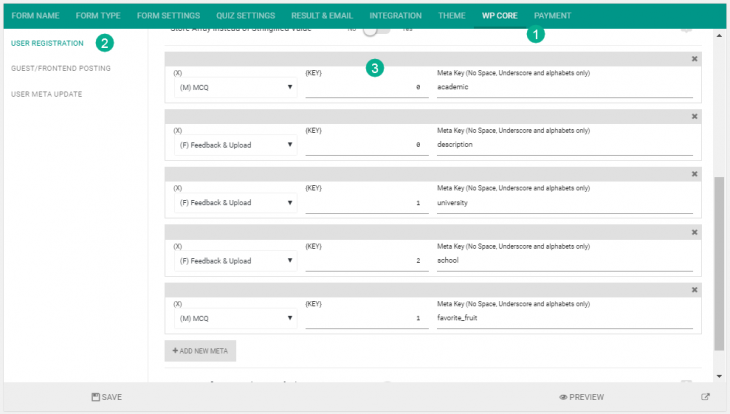
- Go to WP Core > User Registration.
- Scroll down till you see Additional User Meta Data.
- Now use the Add New Meta button to map eForm fields to user metadata.
- In the Meta Key you can also enter built-in keys to override/add such metadata for users. For example, if we add
descriptionto the key, then the element value will be put against user bio section.
The Store Array instead of Stringified Value option gives you the flexibility to store MCQ elements in an array. This data can later be retrieved programmatically by other plugins to do some interesting stuff. For simple use case scenarios, it is better to keep this disabled.
Hiding Registration Fields for Logged in Users
This option effectively makes eForm compatible with both logged in and non-logged in users. Suppose you want to run a survey where user can also register. You simply add registration ability your existing survey form and eForm makes sure it is shown only when users are not logged in. The options can be found under WP Core > User Registration.
- The username and password fields are always hidden for logged in users.
- Hide First Name, Last Name & Email for logged in users: If enabled, then specified fields will be hidden.
- Hide Specified Meta Elements for logged in users: If enabled, then fields you use to collect user metadata will be hidden for logged in users.
Conditional Registration Form
Conditional logic can be applied on the registration process too. You effectively need to apply logic on email, username and password field of your form. If eForm detects that at-least one of the elements are conditionally hidden, then it will stop the registration. So eForm will not register user if any of the following conditions are met:
- Email Address field is not present in the form.
- Email Address field is conditionally hidden.
- Username field is not present or conditionally hidden.
- Password field is not present or conditionally hidden.
Use Registration without username
You can use email field as username –
- Remove username field
- Simply add primary email element.
- Add email Field ID into WP-Core -> Field ID (O) – Other Elements only as explained in the tutorial -> Enable Registration.
That was all about setting up a proper registration form with eForm. If you have any doubt, please ask in the forum.


