Starting from version 2.3.0, eForm comes with a conditional system using which you can show/hide elements based on logic. The system is applicable for all of the built in elements (since version 2.4.0, for lesser version any element that can not have any child elements inside it, like collapsible design element) and uses a reverse mapping technique so that more than one logic can be chained (with OR or AND operator).
#1: Understanding the Elements
To define the conditional logic, you’d need to first understand the (TYPE){KEY} identifier. It is really easy to remember and most of the information are already shown on the form builder itself.
#1.1: Understanding Element Type:

With eForm, we have 4 element types: Design & Security (D), Multiple Choice Question (M), Feedback & File Upload (F), Other Form Elements (O). Each of them is denominated by the single character written inside the parenthesis.
#1.2: Understanding Element Key:
The keys are visible directly from the form builder layout. When you add any element, the key is automatically generated and written into the draggable layout for quick identification.

For the image above, the highlighted element has Type: Multiple Choice Question (M) and key 1.
#2: Applying conditional logic on an element
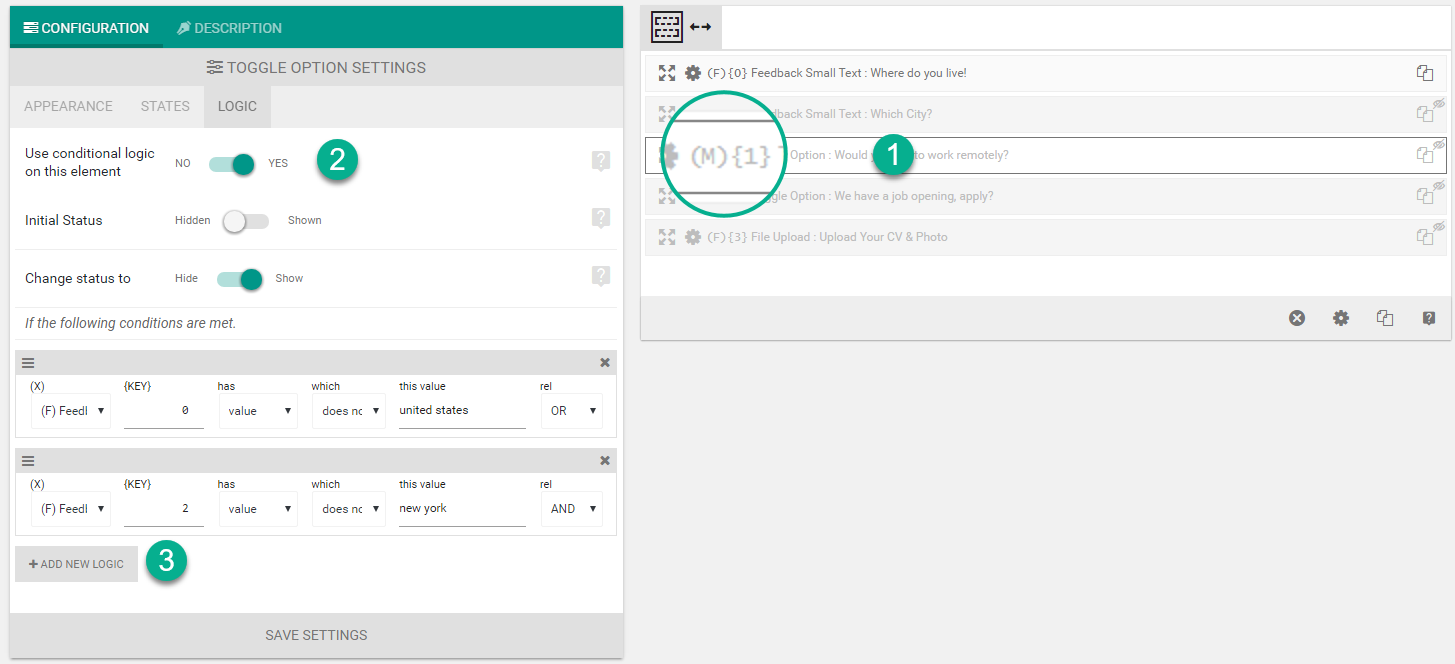
Click on the settings icon [icon type=”glyphicon” class=”ipt-icon-cog2″] of any element and scroll down until you see Conditional Logic section. Click on Use conditional logic on this element and this will enable the conditional logic feature on this element. If you save the settings at this point then you will see the form element going gray on the form builder area. This behavior simply means the initial status of this element is hidden.
#2.1: Other conditional configuration:
There are only two configuration option for conditional logic right now:
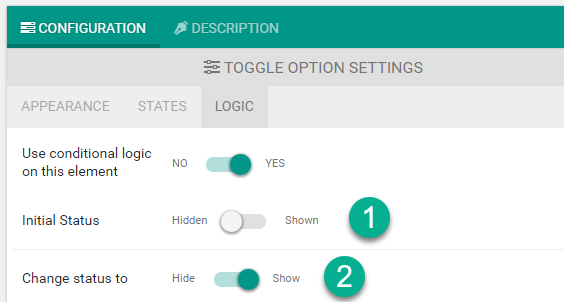
- Initial Status: If shown then the element will be shown initially, otherwise it will be hidden.
- Change Status: You can show or hide the element if your logic satisfies.
#2.2: Conditional Logic:
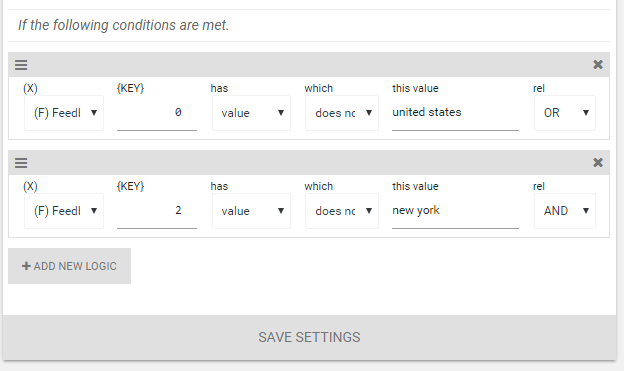
Below the configuration options you will find a table to insert the logic. Click on the Add New Logic button to get started.
The logic are mapped in reverse order. Speaking simply, it is something like this:
- Show/Hide the element initially (when the form is loaded).
- Hide/Show the element by checking against other elements. If all of the logic against other element gets satisfied, then change the visibility of the current element.
This approach enables you to:
- Have multi-criteria logic. The visibility of one element can depend on status of many other elements.
- Have one to one, one to many, many to many and many to one mapping of logic. You can easily create three fields, say First Name, Email and Upload Resume, and show them only if user has entered his age which is greater than 21 and lives near New York city.
The different column of the table has following meanings:
- (X) – The type of the element. Can be either
MCQ (M),Feedback & Upload (F)or Others(O). - {KEY} – The key of the mentioned element type.
- has – Please select value to compare against value or length to compare against length. Value and length may have different meaning for different element types. Please read: Conditional logic interpretation for different elements.
- which – Comparison operator for comparing against the next column.
- equals to Mathematical
=operator. If the user input equals to the next column. - not equals to Mathematical
!=operator. If the user input does not equal to the next column. - greater than Mathematical
>operator. If the user input is greater than the next column. - less than Mathematical
<operator. If the user input is less than the next column. - contains If the user input contains the next column value. For example, the word
WPQuarkcontainsthemes. - does not contain If the user input does not contain the next column value. For example, the word
WPQuarkdoes not containxyz. - starts with If the user input starts with the string at the next column. For example, the word
WPQuarkstarts withWP. - ends with If the user input ends with the string at the next column. For example, the word
WPQuarkends withQuark.
- equals to Mathematical
- this value – The value to operate against (refered as
next columnfor the operator column). Comparison is always case insensitive. In case of Single/Multiple Options, if you wish to put a condition against an option please enter the same value as the label of the option. - rel – The relation operator with the next logic. Can be either
ANDorOR. Multiple relations are always grouped againstOR(more on it below).
#2.3: Grouping multiple conditional logic:
You can add more than one logic to apply a chain. By default the rel operator is always AND, which means, all of the logic must satisfy. You can change any operator to OR if you want any of the logic to satisfy. To make it even easier, we’ve grouped multiple logic against the OR operator. So when you enter X AND Y AND Z OR Y AND Z AND J OR Z AND J AND K, it is interpreted as (X AND Y AND Z) OR (Y AND Z AND J) OR (Z AND J AND K). The parenthesis or grouping simply means that if any of the logic is true, then the condition is considered as satisfied.
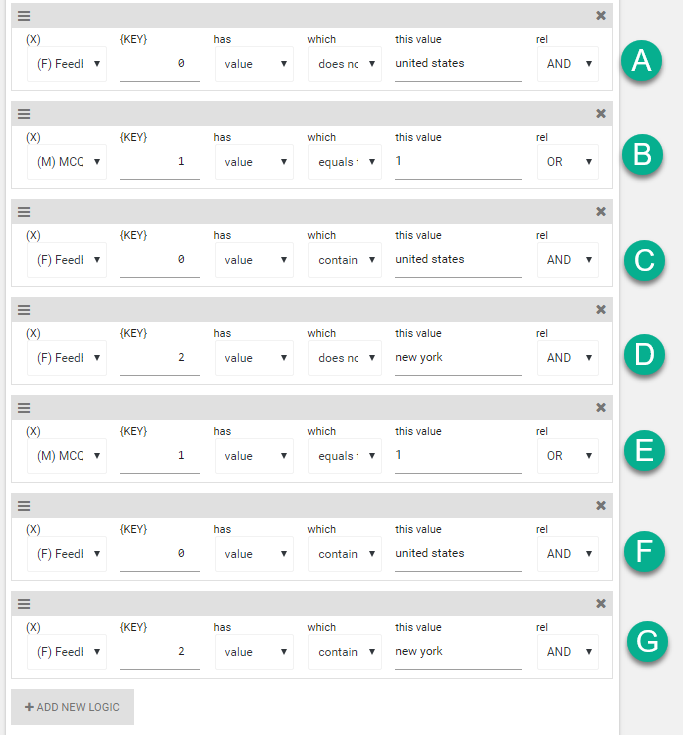
The complex logic shown in the above image will be interpreted as (A AND B) OR (C AND D AND E) OR (F AND G). If any of the conditions inside the parenthesis is satisfied, the logic will be considered satisfied.
#2.4: What happens with hidden elements:
Hidden elements are shown with gray color in the form builder. When ever an element is conditionally hidden:
- It is not shown in the form (frontend).
- It is not shown in the email (both admin and user).
- It is not shown in the quick preview or print summary.
- It is not shown when editing the form (unless of course while editing, it becomes conditionally shown again).
- The validation of the element is ignored, i.e, even if the element is set to required and is conditionally hidden, the user won’t be prompt to enter it’s value.
#3: Rules of thumb:
Make sure to follow these rules when applying conditional logic to any element:
- Do not put any HTML code in any corresponding conditional field. (ie, do not put, for say, an image HTML for an option which would correspond to a certain logic).
- Do not put any LaTeX code in any corresponding conditional field.
- Only numbers and string work.
- Strings are always trimmed (i.e, we get rid of any whitespace at the beginning or at the end) and converted to lowercase before comparison. So make sure, your rules follow the same algorithm.
If you have any other query, please ask in the support forum.
Can You Add a Video Tutorial for this
Will do as soon as we release the next version.
I have a question. I have added a condition that if the element MCQ key 2 has a value of greater than one it will make a field visible. The MCQ key 2 has two possibel answers yes or no. Value of yes is 2 value of no is 0. The issue is once i click on the Yes option and it makes the field visible. it wont hide when i go back to the answer no. The field remains visible and i cannot make it go away.
Please advise how do i need to do to make this work properly?
Please ask in the forum.
It would be nice to be able to apply the logic to a whole container, that is, to a whole survey sheet.
Let’s say you start the survey with a yes/no question (eg. smoking/non smoking).
Then, different containers or sheets can be shown with complete different questions within, as a result of the primary yes/no question.
Unless there is another possibility, as far as I’ve seen, the logic can be applies only applied to most of the elements (D) (F) (M) (O)
oops! I have to correct the comment from before…
as a matter of fact the logic can be applied only within the same container (sheet).
Although you refer in your logical sentence to an item (X){KEY} included in another container (sheet), it won’t affect the stuff shown or not to be shown on another container (sheet)
Hello,
As mentioned before, this is a known bug for us and we are going to release a patch for upcoming version.
Hello,
This seems like a nice idea.
I want to put a question on my quiz and I want the users to type in the answer on their own. How can I use conditional logic and show the result automatically without having to review and approve it? I want the plugin to check if the answer is correct on its own and then show whether the score is correct or not.
E.g. A question would be: The world’s basketball championship was won by _____
If the user enters USA, the plugin should let the user know that the answer is correct and receive a point, while any other answer would be marked as incorrect.
Hello,
Please ask in the forums.