While working with WordPress and several themes and plugins, the most obvious error one can come through is a “White Screen of Death“. The reason can be many, yet the most common one is exceeding PHP memory limit. So let us see how we can increase our PHP memory limit.
[notification type=”alert-info” close=”false” ]This tutorial assumes that your web host allows you to use customize and upload your own php.ini file. If it does not then this guide can not help you. There is no way to find out rather than trying first.[/notification]
Locating your php.ini file:
If you know where your php.ini file is residing, then skip to the next step. Otherwise, follow this guide I wrote sometime back at intechgrity. Once you are done locating and downloading, come back here and follow the rest of the guide.
Increasing memory limit:
Increasing the memory limit involves a number of steps. I’ve generalized the steps for compatibility with most web hosts (even shared hosts).
Editing the ini file:
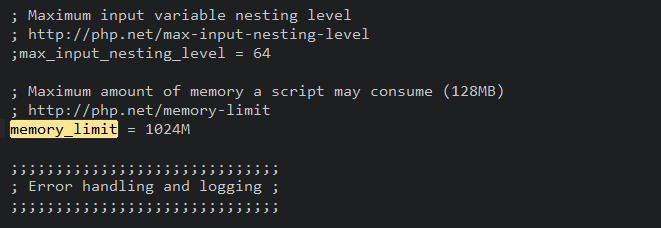
Open the php.ini file using your favorite text-editor (if you ask me, mine is Sublime Text, but that costs $70, so stick with Notepad++). Now, search for the line similar to:
[text]memory_limit = 32M[/text]
The part, 32M says your PHP is limited to use only 32 MB of memory. You need to increase it to something reasonable, like 256M. So after editing, the line should become:
[text]memory_limit = 256M[/text]
Save the file and get ready to upload.
Uploading the modified file:
Upload the file to the root directory of your web server, using FTP. For most of the webhosts, it is usually the /public_html/ directory.
Telling Apache to use the php.ini file globally:
At this point all PHP scripts running under the public_html directory will get 256M of memory. But in some cases, php scripts running under other directories will still get 32M of memory from the original ini file. To prevent this, we need to tell apache to use the php.ini file we uploaded for all php scripts.
Finding the path of the php.ini file:
We need to find the absolute path of the php.ini file. To do this, we are going to apply a neat trick.
First create a file named path.php and edit it with your favorite text editor. Put the following code
[php]
<?php
echo dirname( __FILE__ );
[/php]
Then upload it to the /public_html/ of your server. This is the same place where your php.ini is residing. Now, depending on your domain name, open the URL http://example.com/path.php
The output should be something like this: /home/user/public_html
In this case the path to your php.ini file is /home/user/public_html/php.ini, but we are just going to need the /home/user/public_html part.
Editing/Creating the .htaccess file:
[notification type=”alert-info” close=”false” ]At this point, we are assuming you are running apache webserver with suPHP module. This is pretty common for shared hosting enviroments.[/notification]
If there is an .htaccess file inside /public_html/ then download it or just create a file named .htaccess on your computer. Add the following line to the top of it.
[text]suPHP_ConfigPath /home/user/public_html[/text]
Then upload the file to /public_html/ and we are done. This tells apache to tell suPHP to use the php.ini file residing under the mentioned path.
[toggles class=”yourcustomclass”]
[toggle title=”Problem creating .htaccess file on windows”]
In windows operating system, you can not create a file named .htaccess. A simple solution is to:
- Create a file named
htaccess(don’t do the dot) and add the line. - Upload the file to
/public_html/using FTP. - Now use your FTP software to rename the file to
.htaccess.
[/toggle]
[/toggles]
Uploading to the wp-admin directory for WordPress installation
If you are unable to configure apache global directive, then a quick fix for WordPress would be to place the same php.ini file inside wp-admin directory.
- FTP into your
public_html/.../wp-admindirectory. - Upload the modified
php.inifile.
So the same php.ini file would reside in the root directory of WordPress as well as the wp-admin directory.
Testing memory limit:
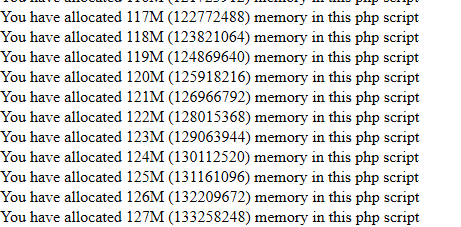
At this point, your php scripts should have 256MB of memory. To test it, create a file named diag.php and put the following code.
[php]
<?php
/**
* Text the maximum memory limit your server can handle
*
* This shows the actual limit
* Should never be used continously on a development server
*
*/
for ($i=1; $i<1000; $i++) {
$a = loadmem($i);
echo "You have allocated ". $i . "M (". memory_get_usage() . ") memory in this php script" . "<br />";
flush();
unset($a);
}
function loadmem($howmuchmeg) {
$a = str_repeat("0", $howmuchmeg * 1024 * 1024); // alocating 10 chars times million chars
return $a;
}
[/php]
Now upload it to the /public_html/ and run it from the URL domain (http://example.com/diag.php). The output should be something like this.
This will show you exactly how much memory PHP can allocate.
Another safer way is to create a file named phpinfo.php and put the following code:
[php]
<?php
phpinfo();
[/php]
Upload it to the /public_html/ and run it from http://example.com/phpinfo.php. Press Ctrl + F on your browser and search for memory_limit. You should be able to find something like this.
[notification type=”alert-danger” close=”false” ]Always delete the path.php, diag.php and phpinfo.php file from your server. Otherwise, anyone can get access to sensitive information.[/notification]
If it still doesn’t solve your problem, then consider asking your web hosting provider. If they do not help you, then it is time to find a better web host.


